Introduction to Cheesy Garlic Rolls
There’s something undeniably comforting about a freshly baked roll, especially when it’s ooey-gooey with cheese and infused with that irresistible garlic flavor. Cheesy garlic rolls are the kind of treat that transforms an ordinary meal into something truly special. Whether you’re hosting friends for a casual dinner or just want to indulge after a long week, these rolls offer a delightful blend of warmth and flavor that can brighten any occasion.
Why cheesy garlic rolls are a perfect homemade treat?
One of the best parts about making cheesy garlic rolls at home is how simple and satisfying the process is. Imagine the smell of garlic wafting through your kitchen as they bake—it’s enough to make anyone feel at home. According to a survey by the American Institute for Cancer Research, cooking at home can lead to healthier eating habits, and there’s no better dish to whip up than these rolls. Here’s why they stand out as the perfect homemade treat:
-
Ease of Preparation: Even if you’re not a seasoned chef, these rolls are straightforward to make. With just a handful of ingredients, you can create something mouthwatering.
-
Customizable Options: Want to spice things up? You can easily add fresh herbs, adjust the cheese blend, or even sneak in some turkey bacon or chicken ham for a twist. The options are endless!
-
Social Food: These rolls are perfect for sharing. Their pillowy texture and cheesy goodness make them a hit at gatherings, game nights, or even a cozy dinner at home with family. You might even win over the pickiest eaters!
-
Nostalgic Comfort: If you have fond memories of enjoying garlic bread at Italian restaurants or family dinners, these cheesy garlic rolls will take you back. Nothing says comfort like a plate of warm rolls fresh from the oven.
Ready to give these tempting treats a try? With just a bit of time and love, you’ll soon be pulling apart cheesy, garlicky goodness that you can proudly say you made yourself. For more recipes on delicious rolls and bread, you can check out resources like King Arthur Baking for expert tips and techniques.
So grab your apron and let’s dive into the cheesy goodness that awaits!
Ingredients for Cheesy Garlic Rolls
Key ingredients for the garlic butter
To create that irresistible garlic flavor, you’ll need the following for your butter mixture:
- Unsalted Butter: Freshly softened is best for easy spreading.
- Garlic: Fresh minced garlic will elevate the dish, but you can opt for garlic powder in a pinch.
- Parsley: Fresh chopped parsley adds a pop of color and freshness.
- Salt: A little sprinkle enhances all the flavors.
These ingredients combine to make a rich, savory base that smothers your rolls and makes them utterly delicious.
Essential ingredients for the dough
The dough is the heart of your cheesy garlic rolls. Here’s what to gather:
- All-Purpose Flour: This is your bread-making staple.
- Yeast: Active dry yeast will help your dough rise beautifully.
- Sugar: Just a touch to feed the yeast.
- Milk: Warm milk promotes a soft, tender texture.
- Egg: Adds richness while binding all the ingredients.
Perfectly mixed, these elements will give you a hearty, fluffy roll.
Filling ingredients you can’t skip
Now for the star of the show—your filling! Don’t leave these out:
- Cheese: Mozzarella or a blend of cheeses offers a wonderful stretch and creaminess.
- Turkey Bacon or Chicken Ham: Chopped finely, these provide a savory punch.
- Italian Seasoning: A blend can elevate the flavor profile.
These filling ingredients definitely take your cheesy garlic rolls to the next level. For an extra kick, consider adding red pepper flakes or fresh herbs.
Want to learn more about how these ingredients impact your rolls? Check out this informative guide on achieving the perfect roll texture.
Step-by-step Preparation of Cheesy Garlic Rolls
Making cheesy garlic rolls can transform your kitchen into the coziest of spaces, filling it with a warm, savory aroma that draws everyone in. Ready to create these delightful rolls? Follow this step-by-step guide for cheesy perfection!
Roast the garlic for that rich flavor
Roasting garlic elevates its naturally sweet, buttery flavor, making it a perfect addition to our cheesy garlic rolls. Start by preheating your oven to 400°F (200°C).
- Take a whole bulb of garlic and slice off the top to expose the cloves.
- Drizzle with a touch of olive oil and wrap it in foil.
- Bake for about 30-35 minutes until the cloves are soft and golden.
Once it’s cool enough to handle, squeeze out the roasted cloves and mash them into a paste. This rich garlic base will take your rolls to the next level!
Prepare the garlic butter
Next, let’s whip up the garlic butter that will give our cheesy garlic rolls that signature flavor. In a mixing bowl, combine:
- ½ cup (1 stick) of softened unsalted butter
- The roasted garlic paste you just made
- A sprinkle of salt
- Fresh parsley (optional, for garnish)
Mix well until thoroughly combined, and set it aside. This buttery goodness will be a game-changer when brushing on top of the rolls!
Activate the yeast mixture
Activate your yeast to ensure your rolls rise beautifully. In a small bowl, combine:
- 2 ¼ teaspoons of active dry yeast
- 1 tablespoon of sugar
- ½ cup (120ml) of warm water (about 110°F or 43°C)
Let this sit for about 5-10 minutes until it becomes frothy. This step is crucial, as it confirms that your yeast is alive and ready to create those fluffy rolls!
Combine and knead the dough
In a large mixing bowl, combine:
- The activated yeast mixture
- 3 cups of all-purpose flour
- 1 teaspoon of salt
Mix until a dough starts to form. Dust your countertop with a bit of flour and knead the dough for about 5-7 minutes until it’s smooth and elastic. Trust me, the work is worth it!
Proof the dough for fluffiness
Place your kneaded dough in a lightly greased bowl, cover it with a cloth, and allow it to rise in a warm spot for about 1 hour, or until doubled in size. This is where all the magic happens; the yeast does its thing, creating a beautiful airy texture.
Roll out and add the filling
Once your dough has risen, punch it down gently and roll it out into a rectangle about ½ inch thick. Spread a generous layer of your prepared garlic butter all over the dough. For added cheesiness, sprinkle:
- 1-2 cups of shredded mozzarella cheese
- A handful of chopped Turkey Bacon or Chicken Ham, if you like.
Cut and second proofing the rolls
Now it’s time to cut the rolled dough! Slice it into strips, then roll each strip tightly into a spiral. Place these rolls in a greased baking dish, ensuring they are close together but not touching.
Cover them and allow them to proof again for about 30 minutes, which will give them that fluffy texture we all love.
Bake to golden perfection
Once your rolls have puffed up nicely, preheat your oven to 375°F (190°C). Bake the rolls for 20-25 minutes or until they turn golden brown. The kitchen will smell amazing at this point!
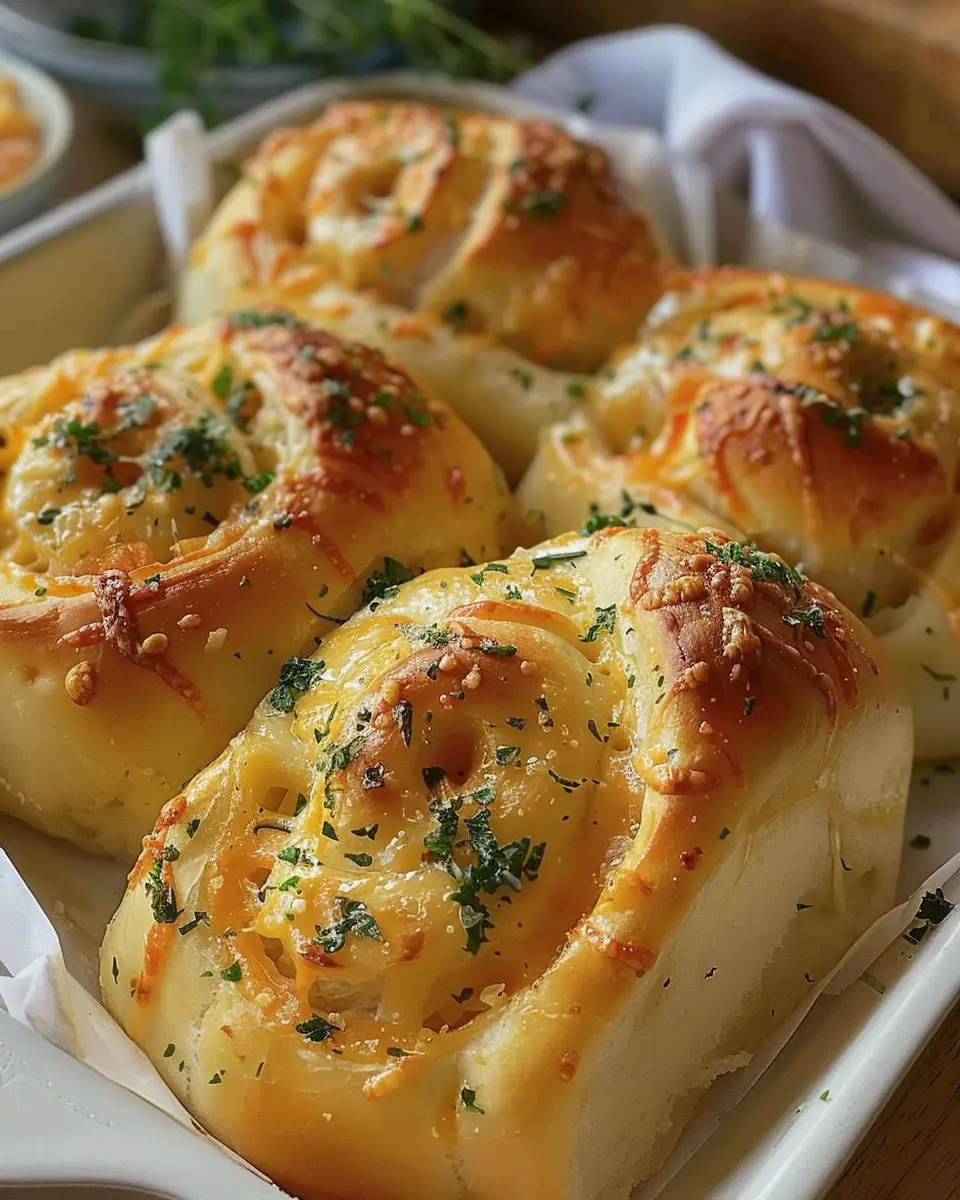
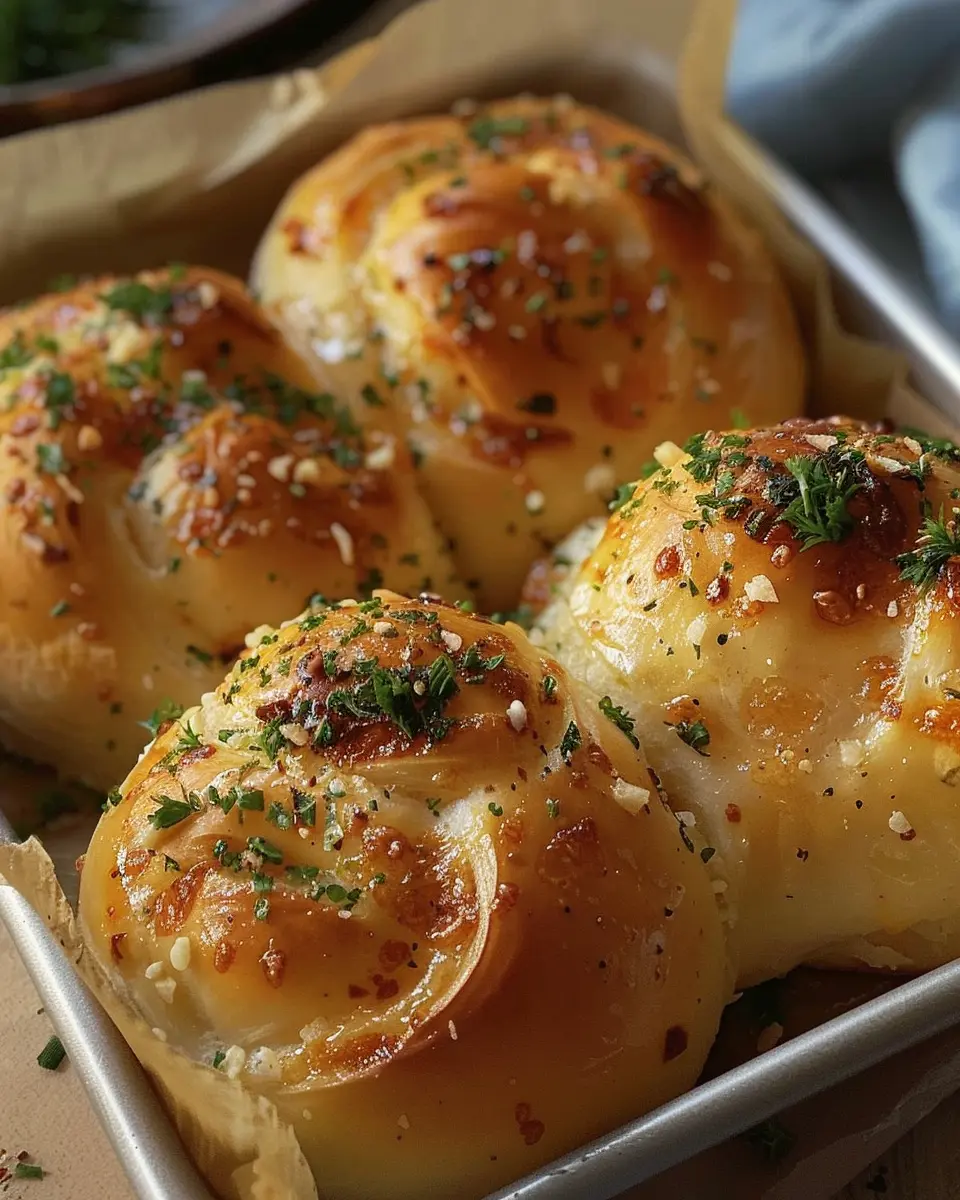
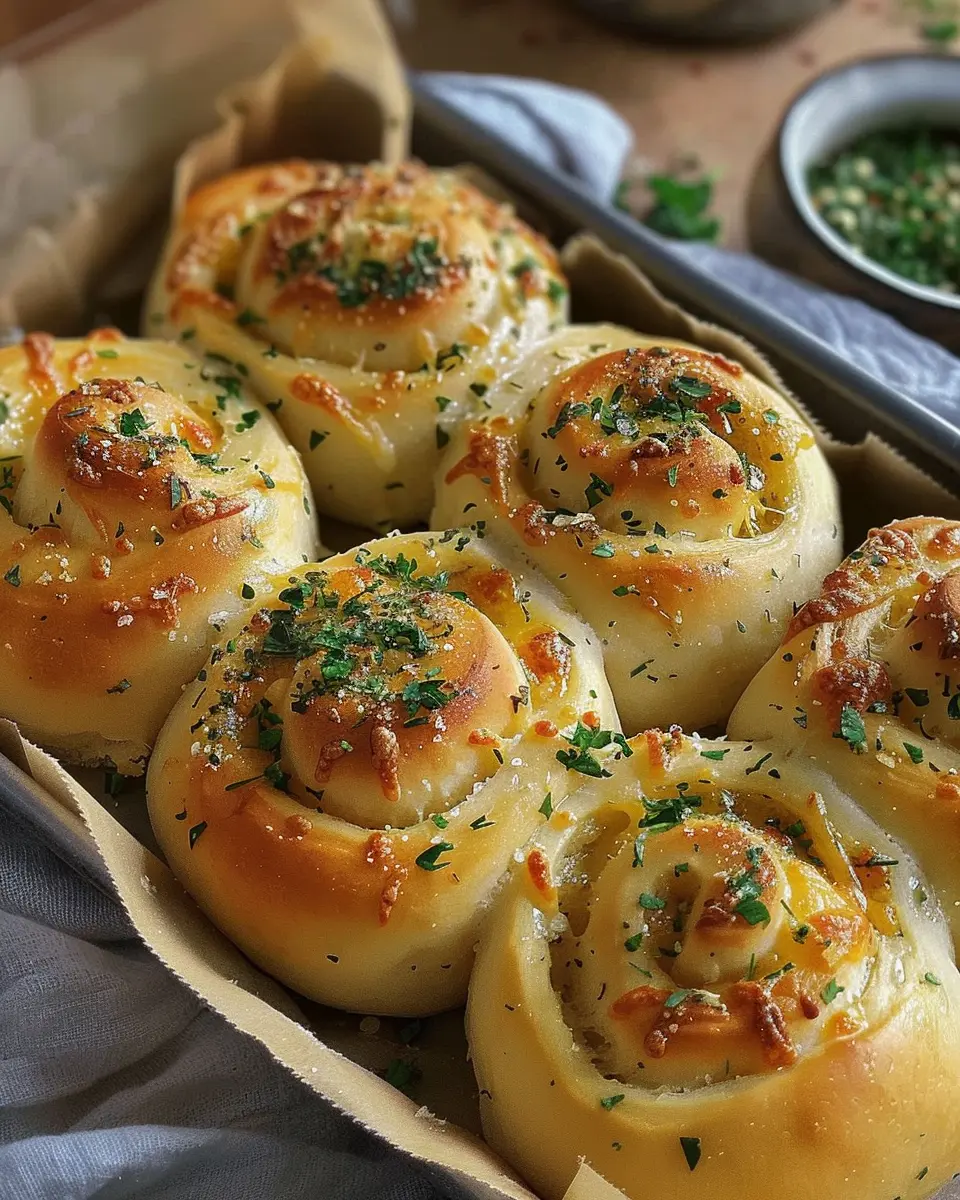
Brush with garlic butter and garnish
As soon as your cheesy garlic rolls come out of the oven, brush them liberally with the leftover garlic butter. This step is crucial; it adds flavor and gives the rolls a beautiful shine.
For an extra touch, sprinkle chopped parsley on top to add a pop of color and freshness.
I hope you enjoy these cheesy garlic rolls as much as I do! With these steps, you’ll impress not only yourself but also anyone lucky enough to share them with you. Bon appétit!

Variations of Cheesy Garlic Rolls
Add Different Cheeses for Flavor Twists
When it comes to cheesy garlic rolls, the cheese variety you choose can radically shift the flavor profile. While classics like mozzarella and cheddar are delightful, don’t hesitate to experiment! Here are some interesting options to consider:
- Gouda: With its rich, buttery flavor, Gouda adds a unique depth to your rolls.
- Parmesan: This hard cheese brings a punch of umami that perfectly complements garlic.
- Cream Cheese: For a creamy twist, mix in some cream cheese—this adds a smooth texture and mild flavor.
- Feta: Crumbled feta introduces a salty, tangy nuance that elevates the overall experience.
Using a blend of these can create a symphony of cheesy goodness. If you love cheese (and who doesn’t?), try mixing and matching until you discover your favorite combination!
Incorporate Fresh Herbs for an Aromatic Touch
Adding fresh herbs is like giving your cheesy garlic rolls a fragrant boost. Herbs not only enhance flavor but also add a beautiful aroma that fills your kitchen. Here are some top picks:
- Parsley: Fresh parsley brightens the flavors and adds a burst of green.
- Thyme: The subtle earthiness of thyme pairs wonderfully with garlic.
- Basil: For an Italian flair, fresh basil can infuse your rolls with a sweet aroma that complements cheesy goodness.
What’s your go-to herb when cooking? Experiment with infusions or a fresh herb blend in your cheesy garlic rolls for that extra special touch. Your taste buds will thank you!
For more insights on using herbs effectively in cooking, check out resources like The Spruce Eats for expert tips.
Cooking Tips and Notes for Cheesy Garlic Rolls
The Importance of Measuring Ingredients Accurately
When it comes to making cheesy garlic rolls, precise measurements can make all the difference. Using too much flour or not enough yeast can result in dense, unappetizing rolls. Invest in a good kitchen scale and measuring cups; this simple step ensures you’ll achieve that heavenly light and fluffy texture every time. Plus, following guidelines from sources like America’s Test Kitchen can unveil more secrets about ingredient ratios.
Tips for Achieving That Perfect Golden Crust
Achieving the ideal golden crust on your cheesy garlic rolls is all about techniques and timing. Here are a few tips:
- Brush with butter: A layer of melted butter on top before baking gives your rolls a beautiful, golden sheen.
- Oven temperature: Preheating your oven well is crucial. A hotter oven helps create that perfect crust while keeping the inside moist.
- Steam for success: Adding a pan of water to the oven can create steam, helping your rolls rise beautifully while getting that lovely color.
Remember, don’t rush it! Patience in baking pays off. Enjoy your rolls fresh out of the oven with your favorite dip or alongside a hearty soup!
Serving Suggestions for Cheesy Garlic Rolls
Pairing with Soups and Salads
Cheesy garlic rolls are versatile delights that make for a perfect companion to a variety of dishes. Think of a warm bowl of creamy tomato soup or a zesty Italian salad to balance those rich, cheesy flavors. The rolls add a delightful crunch, while the soups and salads provide a refreshing contrast. For a gourmet experience, consider blending in fresh herbs, like basil or parsley, with your salad to elevate your meal. And if you’re curious about different soup options, check out this collection of comforting soup recipes.
Serving as an Appetizer or Party Snack
Hosting a get-together? These cheesy garlic rolls can easily steal the spotlight as an appetizer or party snack. Cut them into bite-sized pieces for easy sharing, and serve them alongside savory dips like garlic butter or marinara sauce. They’re sure to have your guests coming back for more! Plus, they pair beautifully with refreshing non-alcoholic beverages like sparkling water infused with a splash of lemon or a fruity iced tea. If you’re looking for more snack ideas, check out these crowd-pleasers.
In short, whether you’re enjoying them with a meal or as a snack, cheesy garlic rolls will always bring a tasty twist to your dining experience!
Time Breakdown for Cheesy Garlic Rolls
When it comes to cheesy garlic rolls, timing is everything! Here’s a quick overview to help you plan your kitchen escapade.
Preparation Time
Getting ready for these delicious rolls takes about 15 to 20 minutes. You’ll want to gather all your ingredients—think dough, garlic, cheese, and of course, the buttery goodness. It’ll fly by as you mix, knead, and roll.
Baking Time
After prepping, the baking part takes roughly 20 to 25 minutes. You’ll watch them puff up and turn golden brown, filling your home with an irresistible aroma.
Total Time
In total, you’re looking at around 40 to 45 minutes from start to finish. Perfect for a cozy dinner or a spontaneous snack!
Ready to dive into the full recipe? Check out our detailed guide here for tips on making these rolls even more delightful!
Nutritional Facts for Cheesy Garlic Rolls
When treating yourself to cheesy garlic rolls, it’s essential to understand what you’re enjoying. Here’s a quick breakdown of their nutritional content:
Calories
A serving of cheesy garlic rolls typically contains approximately 200–250 calories. While they are certainly a decadent treat, pairing them with a fresh salad or soup can create a balanced meal without overindulging.
Protein
Each roll offers about 5–7 grams of protein, mostly coming from the melted cheese. To pack an extra protein punch, consider adding some Turkey Bacon pieces or cooked Chicken Ham as a delightful filling.
Sodium
One thing to keep an eye on is sodium content. With around 400–500 milligrams per roll, it’s wise to enjoy them in moderation, especially for those watching their salt intake. Opt for low-sodium cheese if you’re looking to cut back.
For more information on maintaining a balanced diet, check out trusted sources like the American Heart Association or Nutrition.gov.
FAQs about Cheesy Garlic Rolls
When it comes to cheesy garlic rolls, there are always plenty of questions buzzing around! Let’s dive into some of the most common queries to help you make the most out of your delicious creation.
How can I store leftover cheesy garlic rolls?
Storing your cheesy garlic rolls is simple and effective! Place them in an airtight container at room temperature for up to two days. If you want to keep them fresh longer, refrigerate them. Just make sure to bring them back to room temperature or warm them up in the oven before serving. They’re just as delightful the second time around!
What can I use as a substitute for milk in the recipe?
If you’re out of milk or prefer a non-dairy option, worry not! Some excellent substitutes for milk in your cheesy garlic rolls include:
- Almond milk: This nutty flavor complements the garlic beautifully.
- Soy milk: A great option, and it blends well without altering the taste significantly.
- Oat milk: Creamy and rich, it performs wonderfully in baking.
These alternatives can lend their unique flavors while still keeping your rolls moist and delicious!
Can I freeze cheesy garlic rolls for later?
Absolutely! Freezing your cheesy garlic rolls is a fantastic way to prep for future cravings. Once they’ve cooled completely, wrap them tightly in plastic wrap and then place them in a freezer bag. They can be stored for up to three months. When you’re ready to enjoy, simply thaw and reheat in the oven for that fresh-out-of-the-oven taste.
For more tips on baking and freezing, check out resources like King Arthur Baking which offer great insights on preserving your baked goods. Enjoy your cheesy garlic rolls to the fullest!
Conclusion on Cheesy Garlic Rolls
As you wrap up your culinary journey, I wholeheartedly encourage you to try making these cheesy garlic rolls at home. They not only bring a comforting aroma to your kitchen but also deliver a satisfaction that store-bought alternatives just can’t match. Imagine the joy of pulling warm, gooey rolls from the oven, ready to share with friends and family! Remember, even if things don’t turn out perfectly on your first try, cooking is all about experimentation and learning. So, roll up your sleeves and embrace the adventure—your taste buds will thank you! For tips on custom variations, check out this expert guide.
PrintCheesy garlic rolls: The best indulgent treat for homemade bliss

- Prep Time: 20 minutes
- Cook Time: 25 minutes
- Total Time: 1 hour 45 minutes
- Yield: 12 rolls 1x
- Category: Breads
- Method: Baking
- Cuisine: American
- Diet: Vegetarian
Ingredients
- 3 cups all-purpose flour
- 1 tablespoon sugar
- 1 teaspoon salt
- 1 tablespoon active dry yeast
- 1 cup warm water
- 1/4 cup unsalted butter, melted
- 4 cloves garlic, minced
- 1 cup shredded mozzarella cheese
- 1/4 cup parsley, chopped
Instructions
- In a bowl, mix warm water, yeast, and sugar. Let it sit for 10 minutes until frothy.
- Add flour and salt, mix well, then knead until dough is smooth.
- Let the dough rise in a warm place for 1 hour.
- Preheat oven to 375°F (190°C).
- Roll out dough, spread with melted butter, garlic, and cheese.
- Roll up the dough and cut into pieces.
- Place rolls in a greased baking dish and let rise for another 30 minutes.
- Bake for 20-25 minutes or until golden brown.
Notes
- Brush with extra garlic butter before serving for more flavor.
- You can add herbs like oregano or basil for additional taste.
Nutrition
- Serving Size: 1 roll
- Calories: 150
- Sugar: 1g
- Sodium: 200mg
- Fat: 7g
- Saturated Fat: 4g
- Unsaturated Fat: 2g
- Trans Fat: 0g
- Carbohydrates: 19g
- Fiber: 1g
- Protein: 4g
- Cholesterol: 15mg
Keywords: Cheesy garlic rolls